搭建一个使用 GitLab CI 的项目
前言
产品需求评审后,各自拆分任务,从 master 分支切出一个 release 分支,根据各自任务情况切出 update 或 feature 的开发分支;
开发调试或提测时,将代码 push 到远程分支,提 merge request(以下简称 mr)到 test 分支,GitLab CI 将项目代码自动构建并部署到测试环境;
测试完毕后提 mr 到 release 分支,待本次需求的开发分支都 code review 并合并后,从 release 分支提 mr 到 pre 分支,GitLab CI 将项目代码自动构建并部署到预生产环境,然后进行回归测试,有问题再从 release 分支切出开发分支进行修改,重复之前的流程。
预生产环境没问题后,从 release 分支提 mr 到 master 分支,,然后打 tag 上线,GitLab CI 将项目代码自动构建并部署到生产环境,然后进行回归测试,有问题再发版。
至此一次需求的完整开发流程就告一段落了,其中构建/部署等一些重复工作都是 GitLab CI 帮我们完成,对此一直很好奇,接下来我们就来尝试搭建一个使用 GitLab CI 的项目。
搭建新项目
现有项目中使用 GitLab CI 可以直接跳过这步,从这里开始
可以按下面的步骤一步一步搭建,也可以直接克隆这个仓库:gitlab-ci-example
初始化项目
新建项目文件夹
mkdir gitlab-ci-example
cd gitlab-ci-example
初始化 git 和 npm
git init
npm init -y
新建项目文件
mkdir src build
新建 .gitignore 文件
gitlab-ci-example/.gitignore
dist
node_modules
新建 .editorconfig 文件
gitlab-ci-example/.editorconfig
# editorconfig.org
root = true

[*]
indent_style = space
indent_size = 2
end_of_line = lf
charset = utf-8
trim_trailing_whitespace = true
insert_final_newline = true

[*.md]
trim_trailing_whitespace = false
新建 index.html 文件
gitlab-ci-example/src/index.html
<!DOCTYPE html>
<html lang="en">
  <head>
    <meta charset="UTF-8" />
    <meta name="viewport" content="width=device-width, initial-scale=1.0" />
    <title>Document</title>
  </head>
  <body>
    <div id="app">
      <h1>Learn Gitlab CI</h1>
    </div>
  </body>
</html>
新建 main.js 文件
gitlab-ci-example/src/main.js
function appendElementToAPP({ tag = "div", content = "" }) {
  const appEle = document.getElementById("app");
  const newEle = document.createElement(tag);
  newEle.innerHTML = content;
  appEle.append(newEle);
}

appendElementToAPP({
  tag: "div",
  content: `append content by js on ${new Date().toUTCString()}`,
});
新建 webpack.dev.js 文件
gitlab-ci-example/build/webpack.dev.js
"use strict";
const path = require("path");
const HtmlWebpackPlugin = require("html-webpack-plugin");

const resolve = (dir) => path.resolve(__dirname, "../", dir);

module.exports = {
  mode: "development",
  entry: {
    app: "./src/main.js",
  },
  output: {
    path: resolve("dist"),
    filename: "[name].[hash].js",
  },
  resolve: {
    extensions: [".js"],
  },
  devServer: {
    port: 8090,
    contentBase: resolve("dist"),
  },
  plugins: [
    new HtmlWebpackPlugin({
      filename: resolve("dist/index.html"),
      template: "src/index.html",
    }),
  ],
};
新建 webpack.prod.js 文件
gitlab-ci-example/build/webpack.prod.js
"use strict";
const path = require("path");
const { CleanWebpackPlugin } = require("clean-webpack-plugin");
const HtmlWebpackPlugin = require("html-webpack-plugin");

const resolve = (dir) => path.resolve(__dirname, "../", dir);

module.exports = {
  mode: "production",
  entry: {
    app: "./src/main.js",
  },
  output: {
    path: resolve("dist"),
    filename: "[name].[hash].js",
  },
  plugins: [
    new CleanWebpackPlugin(),
    new HtmlWebpackPlugin({
      filename: resolve("dist/index.html"),
      template: "src/index.html",
    }),
  ],
};
新建 append-element.js 文件
gitlab-ci-example/build/append-element.js.sh
const path = require("path");
const fs = require("fs");
const cheerio = require("cheerio");

const htmlFilePath = path.resolve(__dirname, "../dist/index.html");

fs.readFile(htmlFilePath, (err, data) => {
  if (err) {
    return;
  }
  const $ = cheerio.load(data);
  $("#app").append(
    `<div style="color: red;">append content by build on ${new Date().toUTCString()}</div>`
  );
  fs.writeFileSync(htmlFilePath, $.html());
});
新建 deploy-test.sh 文件
gitlab-ci-example/build/deploy-test.sh
cp -rf dist/* /www/test/gitlab-ci-example
修改 package.json 文件
gitlab-ci-example/package.json
{
  "name": "gitlab-ci-example",
  "version": "0.0.1",
  "description": "",
  "main": "index.js",
  "scripts": {
    "deploy-test": "build/deploy-test.sh",
    "dev": "webpack-dev-server --config build/webpack.dev.js",
    "build": "webpack --config build/webpack.prod.js && node build/append-element.js"
  },
  "keywords": [],
  "author": "",
  "license": "ISC"
}
安装项目依赖
npm i -D cheerio webpack webpack-cli webpack-dev-server clean-webpack-plugin html-webpack-plugin
运行项目
npm run dev
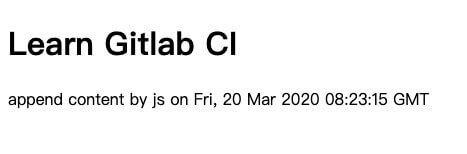
在浏览器中打开链接:http://localhost:8090/ ,你应该能看到:
打包项目
npm run build
在浏览器中打开 dist 目录下的 index.html 文件,你应该能看到:

至此项目的基本功能搭建完成,接下来开始在项目中使用 GitLab CI。
项目中使用 GitLab CI
使用 GitLab CI之前,你得先准备一下:
- 一台云服务器
- 一个
GitLab仓库
设置 GitLab Runner
在仓库主页,点击侧边栏 - Settings - CI / CD,跳转 CI / CD Settings 页面,展开 Runners 选项,按步骤手动设置 GitLab Runner:
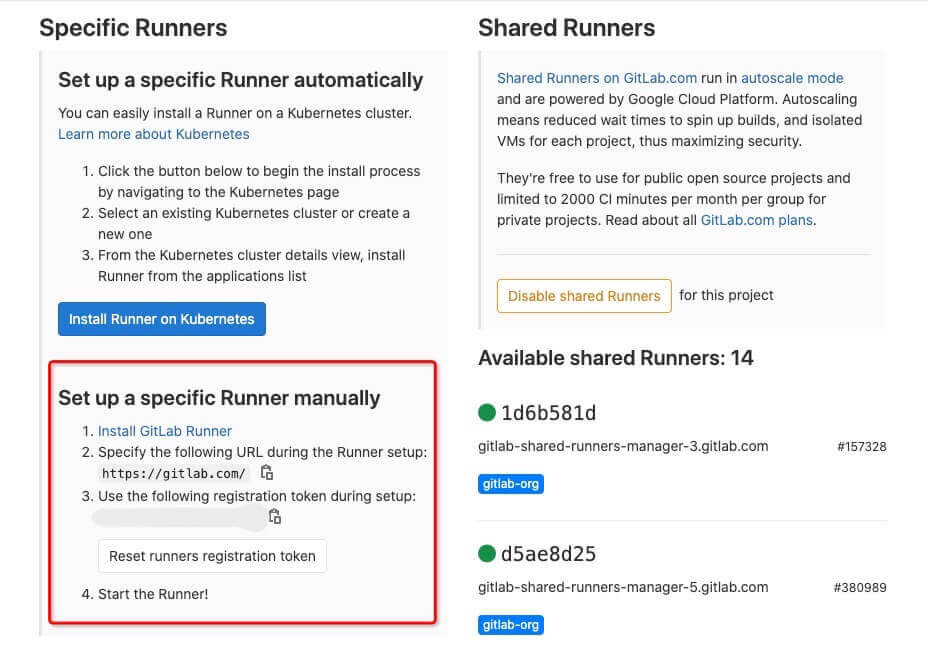
安装 GitLab Runner
根据系统架构,下载并安装对应的软件包,查看详情
# 下载(适用于amd64的软件包)
curl -LJO https://gitlab-runner-downloads.s3.amazonaws.com/latest/deb/gitlab-runner_amd64.deb

# 如果下载太慢,建议在本地下载好之后,通过scp命令复制到远程,类似这样
# scp ~/gitlab-runner_amd64.deb yourUserName@yourIPAddress:/home/yourUserName

# 安装
sudo dpkg -i gitlab-runner_amd64.deb
# 输出
Selecting previously unselected package gitlab-runner.
(Reading database ... 67015 files and directories currently installed.)
Preparing to unpack gitlab-runner_amd64.deb ...
Unpacking gitlab-runner (13.0.1) ...
Setting up gitlab-runner (13.0.1) ...
GitLab Runner: detected user gitlab-runner
Runtime platform                                    arch=amd64 os=linux pid=28968 revision=21cb397c version=13.0.1
gitlab-runner: Service is not installed.
Runtime platform                                    arch=amd64 os=linux pid=28975 revision=21cb397c version=13.0.1
gitlab-ci-multi-runner: Service is not installed.
Runtime platform                                    arch=amd64 os=linux pid=28993 revision=21cb397c version=13.0.1
Runtime platform                                    arch=amd64 os=linux pid=29039 revision=21cb397c version=13.0.1

# 如果你收到类似上面的报错,运行下面的命令,如果能输出信息表示正常
sudo gitlab-runner status
# 输出
Runtime platform                                    arch=amd64 os=linux pid=29971 revision=21cb397c version=13.0.1
gitlab-runner: Service is running!
对于上面的报错信息,可以看看这个 gitlab issue
注册 GitLab Runnner
开始注册,下面是 Linux 的例子,其他系统请看这里
# 注册
sudo gitlab-runner register
# 输出
Runtime platform                                    arch=amd64 os=linux pid=31237 revision=21cb397c version=13.0.1
Running in system-mode.

# 指定 GitLab 实例 URL
Please enter the gitlab-ci coordinator URL (e.g. https://gitlab.com/):
https://gitlab.com/

# 输入注册令牌(从项目-设置-CI/CD 设置-Runners 那里拷贝)
Please enter the gitlab-ci token for this runner:
JhXh7o********yDXATd

# 输入描述
Please enter the gitlab-ci description for this runner:
[hostname]: runner-001

# 输入关联标签
Please enter the gitlab-ci tags for this runner (comma separated):
runner-001-tag
# 输出
Registering runner... succeeded                     runner=JhXh7oEx

# 选择执行环境,这里选择的是 shell
Please enter the executor: virtualbox, docker-ssh+machine, kubernetes, parallels, shell, ssh, docker+machine, custom, docker, docker-ssh:
shell
# 输出
Runner registered successfully. Feel free to start it, but if it\'s running already the config should be automatically reloaded!
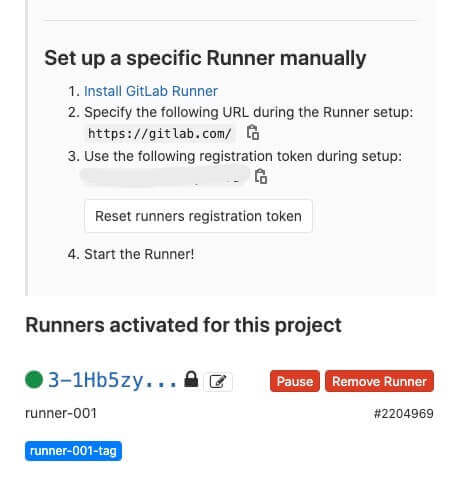
下载安装并注册完 Runner 后,返回 CI / CD Settings 页面,现在应该能看到项目关联的 Runner
配置 GitLab CI
设置完 GitLab Runner 后,我们就可以开始配置 GitLab CI 了,新建 .gitlab-ci.yml 文件
gitlab-ci-example/.gitlab-ci.yml
# 工作名称
job-test:
  # 阶段
  stage: test
  # 触发条件:test 分支更新时
  only:
    - test
  # 指定工作给具有特定标签的 Runners
  tags:
    - runner-001-tag
  # 脚本
  script:
    - npm install
    - npm run build
    - npm run deploy-test
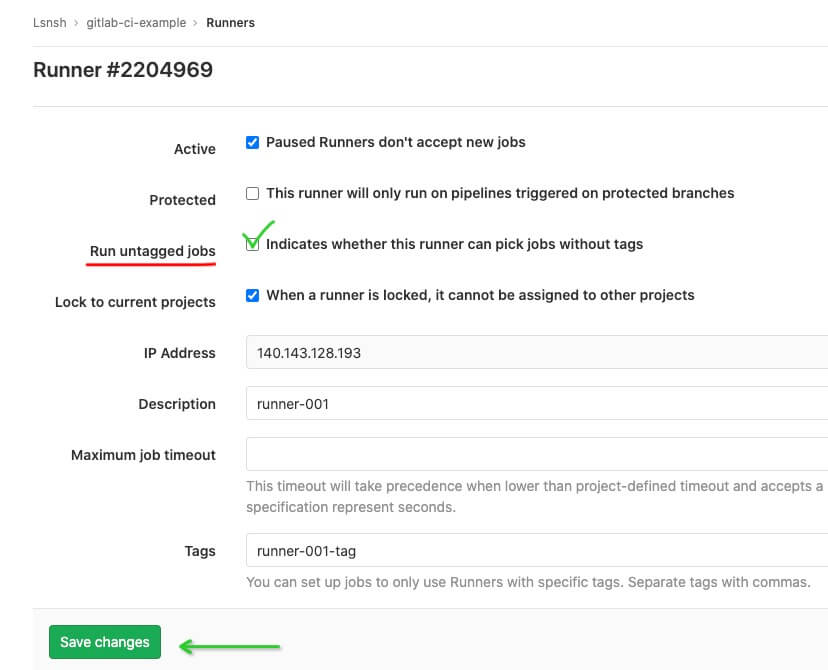
默认情况下 GitLab Runner 不会运行没有 tags 的工作,所以这里我们指定注册 GitLab Runner 时候设置的标签:runner-001-tag,查看更多 GitLab CI/CD 配置选项
如果你不想设置 tags,可以修改 GitLab Runner 的配置,勾选 Run untagged jobs,表示允许 GitLab Runner 运行没有设置 tags 的任务。
保存 .gitlab-ci.yml 文件后,将改动 push 到远程仓库
触发 GitLab CI
配置文件有了之后,我们需要将其触发,从包含上面改动的分支,切出一个 test 分支,提交到远程,用于触发 GitLab CI(新提交和合并 test 分支都会触发 CI ),当然通过图形化界面创建 test 分支也是可以的
git checkout test
git push -u origin test
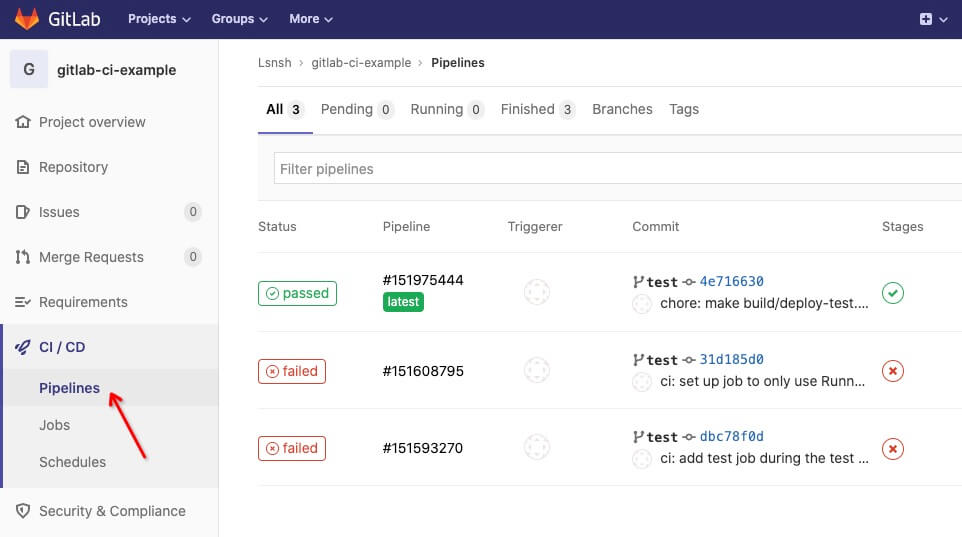
在仓库主页,点击侧边栏 - CI / CD - Pipelines,就能看到当前仓库所有的 CI 记录,类似下面这样:
遇到的问题
1. mkdir: cannot create directory ‘/home/gitlab-runner/builds/3-1Hb5zy’: Permission denied
 Running with gitlab-runner 13.0.1 (21cb397c)
   on runner-001 3-1Hb5zy
Preparing the "shell" executor 00:00
 Using Shell executor...
Preparing environment 00:00
 Running on xx-ubuntu...
Getting source from Git repository 00:00
 mkdir: cannot create directory ‘/home/gitlab-runner/builds/3-1Hb5zy’: Permission denied
Uploading artifacts for failed job 00:00
 mkdir: cannot create directory ‘/home/gitlab-runner/builds/3-1Hb5zy’: Permission denied
 ERROR: Job failed: exit status 1
原因:
将代码 push 到远程之后,构建出现了上面的报错,GitLab Runner 构建时使用的是 gitlab-runner 用户,创建目录的时候提示权限不足,尝试查看目录信息:
# 查看文件和目录信息
ls -alF /home/gitlab-runner
# drwxr-xr-x 4 root          root          4096 Jun  2 17:45 builds/
当前目录的权限和权限组都是 root ,gitlab-runner 用户不在 root 权限组下,所以没权限操作。
仔细想想 🤔 发现不对劲,GitLab Runner 构建时使用的是 gitlab-runner 用户,但是为什么 builds 目录在 root 权限组下?回想一下在此之前做过哪些和 root 用户相关的操作,经过确认和查阅资料后发现,原来是在这次构建之前,手动安装服务(gitlab-runner install)的时候指定使用 root 用户(--user root)导致的:
# 安装服务,指定工作目录,指定运行任务的用户为 root 用户
sudo gitlab-runner install --working-directory /home/gitlab-runner --user root
如何解决:
删除 builds 目录、卸载重装 gitlab-runner 服务,将服务关联的用户指回 gitlab-runner 用户
# 停止服务
sudo gitlab-runner stop
# 卸载服务
sudo gitlab-runner uninstall
# 重新安装服务,指定工作目录和用户
sudo gitlab-runner install --working-directory /home/gitlab-runner --user gitlab-runner
# 完整配置
# sudo gitlab-runner install --working-directory /home/gitlab-runner --config /etc/gitlab-runner/config.toml --service gitlab-runner --syslog --user gitlab-runner
# 校验
sudo gitlab-runner verify
# 启动服务
sudo gitlab-runner start
# 查看状态
sudo gitlab-runner status
# 再次查看文件和目录信息
ls -alF /home/gitlab-runner
# drwxrwxr-x 3 gitlab-runner gitlab-runner 4096 Jun  3 16:21 builds/
现在 builds 目录的权限归回 gitlab-runner 用户所有了,在 gitlab 仓库的 Pipelines 或 Jobs 页面找到这次工作关联的 retry 按钮,点击按钮尝试重新运行构建
2. bash: line 92: npm: command not found
 Running with gitlab-runner 13.0.1 (21cb397c)
   on runner-001 3-1Hb5zy
Preparing the "shell" executor  00:00
 Using Shell executor...
Preparing environment 00:00
 Running on VM-0-5-ubuntu...
Getting source from Git repository  00:03
 Fetching changes with git depth set to 50...
 Reinitialized existing Git repository in /home/gitlab-runner/builds/3-1Hb5zy/0/Lsnsh/gitlab-ci-example/.git/
 Checking out 4e716630 as test...
 Skipping Git submodules setup
Restoring cache 00:00
Downloading artifacts 00:00
Running before_script and script  00:00
 $ npm install
 bash: line 92: npm: command not found
Running after_script  00:00
Uploading artifacts for failed job  00:00
 ERROR: Job failed: exit status 1
原因:
重装服务后 retry 构建后,出现了上面的报错,原因是因为 gitlab-runner 用户所处的环境没有安装 node 导致的(默认情况下在 root 或者其他用户上安装的 node 在 gitlab-runner 用户所处环境是访问不到的)
如何解决:
登录服务器,切换到 gitlab-runner 用户,安装 nvm,再安装 node
# 切换到 root 用户
sudo su
# 登录 gitlab-runner 用户
su -l gitlab-runner
# 安装 nvm(https://github.com/nvm-sh/nvm),如果访问脚本443,尝试用其他方式安装 nvm 或者直接安装 node
curl -o- https://raw.githubusercontent.com/nvm-sh/nvm/v0.35.3/install.sh | bash
# 查看 nvm
nvm ls
# 安装 node(截止目前最新LTS版本为:12.18.0,自行选择版本安装)
nvm install 12.16.2
# 查看 node 和 npm 版本
node -v
npm -v
现在 gitlab-runner 用户所处环境已经安装 node 了,高兴的尝试 retry 后,发现依然是 bash: line 92: npm: command not found,一度以为是错觉、是服务没有检测到 node 的存在,尝试重装、重启 gitlab-runner 服务后 retry 依然是 failed。
冷静一番后,查阅大量类似案例,初步判断可能是环境变量没加载,也就是 nvm 没有加载导致的,尝试在构建过程中手动加载 ~/.bashrc 文件:
before_script:
  - source ~/.bashrc
重新 retry 后依然还是 failed,最后还是在 ~/.profile 和 ~/.bashrc 两个配置文件头部的一些注释信息里,找到了一些新的灵感:
~/.profile
# ~/.profile: executed by the command interpreter for login shells.
# ...
直译过来:~/.profile: 由命令解释器针对登录 shell 执行。
~/.bashrc
# ~/.bashrc: executed by bash(1) for non-login shells.
# ...
直译过来:~/.bashrc:由 bash(1) 对非登录 shell 执行。
以上信息中提到了登录与非登录两种状态,配置文件在对应状态下才会执行,通过添加调试信息发现,在 gitlab-runner 执行任务构建时,不会加载 ~/.bashrc 文件,只会加载 ~/.profile 文件;而通过 ssh 登录服务器时,两个文件都会加载,是不是有些疑惑 🤔,这是因为 ~/.profile 文件在开头会根据环境(bash)决定是否要先加载 ~/.bashrc 文件,具体代码如下:
# ~/.profile: executed by the command interpreter for login shells.
# This file is not read by bash(1), if ~/.bash_profile or ~/.bash_login
# exists.
# see /usr/share/doc/bash/examples/startup-files for examples.
# the files are located in the bash-doc package.

# the default umask is set in /etc/profile; for setting the umask
# for ssh logins, install and configure the libpam-umask package.
#umask 022

# if running bash
if [ -n "$BASH_VERSION" ]; then
    # include .bashrc if it exists
    if [ -f "$HOME/.bashrc" ]; then
	. "$HOME/.bashrc"
    fi
fi
要解决 npm 命令找不到这个问题,需要在 ~/.profile 配置文件添加上加载 nvm 的代码:
# 编辑配置文件
vi ~/.profile
# 配置 nvm 加载,将下面的代码添加到配置文件中(https://github.com/nvm-sh/nvm#installing-and-updating)
export NVM_DIR="$([ -z "${XDG_CONFIG_HOME-}" ] && printf %s "${HOME}/.nvm" || printf %s "${XDG_CONFIG_HOME}/nvm")"
[ -s "$NVM_DIR/nvm.sh" ] && \. "$NVM_DIR/nvm.sh" # This loads nvm
# 保存配置文件后,重新加载配置文件
source ~/.profile
3. sh: 1: build/deploy-test.sh: Permission denied
$ npm run deploy-test
> gitlab-ci-example@1.0.0 deploy-test /home/ubuntu/builds/3-1Hb5zy/0/Lsnsh/gitlab-ci-example
> build/deploy-test.sh
sh: 1: build/deploy-test.sh: Permission denied
npm ERR! code ELIFECYCLE
npm ERR! errno 126
npm ERR! gitlab-ci-example@1.0.0 deploy-test: `build/deploy-test.sh`
npm ERR! Exit status 126
npm ERR!
npm ERR! Failed at the gitlab-ci-example@1.0.0 deploy-test script.
# ...
原因:
# 在项目构建目录下(类似:/home/ubuntu/builds/3-1Hb5zy/0/Lsnsh/gitlab-ci-example),查看部署脚本的权限信息
ls -alF ./build/deploy-test.sh
# -rw-rw-r-- 1 ubuntu ubuntu   42 Jun  2 19:40 deploy-test.sh
通过以上命令发现和搜索相关问题,发现 deploy-test.sh 文件不具备可执行权限,所以无法执行
如何解决:
- 直接更改
deploy-test.sh文件权限
# 表明 deploy-test.sh 文件是可执行的
git update-index --chmod=+x ./build/deploy-test.sh
# 改动会直接进入暂存区,编辑器的 git state 可能表明还有新的更改,忽略后直接提交本次更改后,git state 的状态会更新
git commit -m 'Make build.sh executable'
# 提交到远程,master, test 或者其他分支
git push
- 通过
sh命名执行deploy-test.sh文件
# package.json
- "deploy-test": "build/deploy-test.sh",
+ "deploy-test": "sh build/deploy-test.sh",
4. /www/test/gitlab-ci-example: No such file or directory
$ npm run deploy-test
> gitlab-ci-example@1.0.0 deploy-test /home/gitlab-runner/builds/3-1Hb5zy/0/Lsnsh/gitlab-ci-example
> build/deploy-test.sh
/www/test/gitlab-ci-example: No such file or directory
Please create this directory and then assign the directory permissions to the gitlab-runner user.
You can execute the following command as root:
mkdir /www/test/gitlab-ci-example
chown gitlab-runner /www/test/gitlab-ci-example
原因:
build/deploy-test.sh 脚本会将构建好的代码,拷贝到 /www/test/gitlab-ci-example 目录下,因此在构建之前需要先创建好这个目录
如何解决:
参考 build/deploy-test.sh 脚本中打印出的提示信息,新建并分配目录权限即可:
# 新建目录(使用 root 用户或者其他 gitlab-runner 用户以为的用户)
mkdir /www/test/gitlab-ci-example
# 分配 gitlab-runner 用户文件夹权限
chown gitlab-runner /www/test/gitlab-ci-example
总结
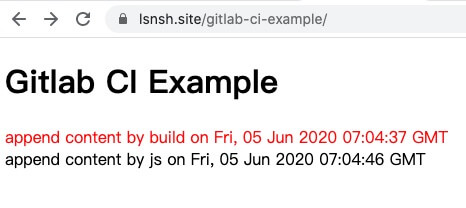
至此,CI 终于可以跑通了,部署后页面的内容是这样的,点击查看:
通过 .gitlab-ci.yml 配置文件,你可以在构建的各个阶段做处理,比如你可以在 before_script 和 after_script 阶段调用钉钉机器人接口,及时将部署状态同步到个人/群:
before_script:
  # 钉钉通知 钉钉群
  - curl -X POST 'https://oapi.dingtalk.com/robot/send?access_token=xxx&xxxx'
通知类似下面这样:

更多关于 .gitlab-ci.yml 文件的配置信息,请看官方文档
好利用 CI / CD 这件工具,相信会大大提升团队协作和开发效率。万事开头难,起初肯定会有抵触心理,迈过这道坎之后,还有下一道坎等着你[手动狗头]
示例项目的仓库链接如下,欢迎 star 🌟:
github 仓库(template):https://github.com/Lsnsh/gitlab-ci-example
gitlab 仓库:https://gitlab.com/Lsnsh/gitlab-ci-example
命令汇总
# 查看 gitlab-runner 相关进程
ps aux|grep gitlab-runner

# 注册 gitlab-runner
sudo gitlab-runner register

# 重装 gitlab-runner 服务
# 停止服务
sudo gitlab-runner stop
# 卸载服务
sudo gitlab-runner uninstall
# 重新安装服务,指定工作目录和用户
sudo gitlab-runner install --working-directory /home/gitlab-runner --user gitlab-runner
# 完整配置
# sudo gitlab-runner install --working-directory /home/gitlab-runner --config /etc/gitlab-runner/config.toml --service gitlab-runner --syslog --user gitlab-runner
# 校验
sudo gitlab-runner verify
# 启动服务
sudo gitlab-runner start
# 查看状态
sudo gitlab-runner status

# 拷贝文件到远程主机
# scp ~/gitlab-runner_amd64.deb yourUserName@yourIPAddress:/home/yourUserName
# eg: (将文件 ~/gitlab-runner_amd64.deb 拷贝到远程主机,公网 IP 为 110.120.130 的 root 用户目录下)
scp ~/gitlab-runner_amd64.deb root@110.120.130:/home/root

# 查看文件和目录信息
# eg: (查看 /home/gitlab-runner 目录)
ls -alF /home/gitlab-runner

# 切换到 root 用户
sudo su
# root 用户登录其他用户
# eg: (登录 gitlab-runner 用户)
su -l gitlab-runner

# 表明文件是可执行的
# git update-index --chmod=+x 文件路径
# 表明文件是不可执行的
# git update-index --chmod=-x 文件路径
# eg: (表明 ./build/deploy-test.sh 文件是可执行的)
git update-index --chmod=+x ./build/deploy-test.sh

# 给用户分配文件或文件夹权限
# chown 用户名 文件或文件夹路径
# eg: (分配 gitlab-runner 用户 /www/test/gitlab-ci-example 文件夹权限)
chown gitlab-runner /www/test/gitlab-ci-example